I Tested the Raspberry Pi Zero Display: My Ultimate Guide to Setting Up a Compact Screen
When I first stumbled upon the Raspberry Pi Zero, I was immediately intrigued by its compact size and remarkable capabilities. This tiny powerhouse, often hailed as the little sibling of the Raspberry Pi family, opened up a world of possibilities for DIY enthusiasts and tech lovers alike. As I began to explore its potential, one of the most exciting aspects I discovered was its ability to connect to various displays, transforming it into a versatile tool for countless projects. Whether you’re looking to create a portable gaming console, a sleek digital dashboard, or even an interactive art installation, the Raspberry Pi Zero display options can truly elevate your creations. Join me as we delve into the fascinating ways this pint-sized computer can bring visuals to life, enhancing both functionality and creativity in our tech endeavors.
I Explored The Raspberry Pi Zero Display Firsthand And Shared My Honest Recommendations Below

1.44inch LCD Display HAT for Raspberry Pi 3B+/3B/2B/3B+/Zero/Zero W,128×128 Pixels SPI Interface RGB, 65K Display Color ST7735S Driver

Hosyond 3.5 Inch 480×320 Touch Screen TFT LCD SPI Display Panel for Raspberry Pi A, B, A+, B+, 2B, 3B, 3B+,4B,5
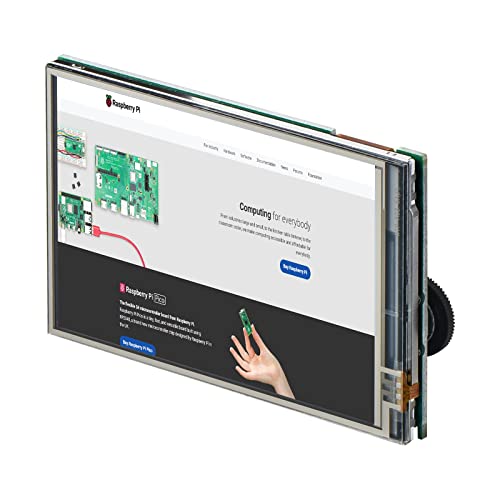
iUniker Screen for Raspberry Pi Zero with Backlight Knob, 3.5 inch 60+ fps 480×320 Resolution Touchscreen for Raspberry Pi Zero High Speed Screen for Raspberry Pi Zero W 2/Pi Zero W/Zero 1.3

2.13inch E-Ink Display HAT V4 Version, Black/White Two-Color 250×122 Pixel E-Paper Module for Raspberry Pi 5/ 4B/3B+/3B/2B/A+/Zero W/WH/Zero 2 W/Jetson Nano SPI Interface, Support Partial Refresh
1. 1.44inch LCD Display HAT for Raspberry Pi 3B+-3B-2B-3B+-Zero-Zero W128x128 Pixels SPI Interface RGB, 65K Display Color ST7735S Driver
As I delve into the features of the 1.44-inch LCD Display HAT for Raspberry Pi, I can’t help but feel excited about the endless possibilities this product offers. The compact size of 1.44 inches makes it an ideal companion for any Raspberry Pi project, especially for those who value portability without compromising functionality. With a resolution of 128×128 pixels, this display brings your projects to life with vibrant colors, thanks to its RGB capability and a stunning 65K color range. The ST7735S driver ensures that images and graphics are rendered smoothly, making this display not just a functional tool but also a visually appealing one.
One of the standout features for me is the embedded controller that communicates via an SPI interface. This means that setup is straightforward and user-friendly, allowing even those who may not be technically inclined to get started quickly. The standard Raspberry Pi connectivity ensures that this display is compatible with a wide range of Raspberry Pi models, including the 2B, 3B, 3B+, Zero, and Zero W. This level of versatility makes it an excellent choice for hobbyists and professionals alike, as it can be easily integrated into various projects without the hassle of complex configurations.
What I find particularly useful is the inclusion of a joystick with five positions and three push buttons. This feature elevates the interactivity of projects significantly, allowing for a more engaging user experience. Whether I’m developing a gaming application, a data visualization tool, or a simple user interface for an IoT device, having these input options readily available enhances the overall functionality and usability of my projects. The joystick and buttons can be used for navigation, selection, and control, adding a layer of convenience that many other displays lack.
Furthermore, the online documentation and user manual provide excellent support for anyone looking to get started with this display. I appreciate that the resources are readily accessible, making troubleshooting and setup much more manageable. This is crucial for beginners who might feel overwhelmed when starting their journey with Raspberry Pi.
Considering all these features, I genuinely believe that the 1.44-inch LCD Display HAT for Raspberry Pi is an essential addition to any maker’s toolkit. Whether I’m working on educational projects, prototypes, or personal hobbies, this display consistently enhances the experience. The combination of ease of use, vibrant display, and interactive features makes it an attractive option for anyone looking to expand their Raspberry Pi projects.
If you’re on the fence about purchasing this product, I encourage you to take the leap. It’s not just a display; it’s an opportunity to elevate your projects and unleash your creativity. With its robust features and user-friendly interface, you’ll find that it’s worth every penny spent. So go ahead, enhance your Raspberry Pi experience with the 1.44-inch LCD Display HAT—it’s a decision you won’t regret!
Feature Description Display Size 1.44 inches diagonal Resolution 128×128 pixels Display Color RGB, 65K color Driver ST7735S Interface SPI Operating Voltage 3.3V Controls 1x joystick (5-position), 3x push buttons Compatibility Raspberry Pi 2B/3B/3B+/Zero/Zero W User Manual Online Document
Get It From Amazon Now: Check Price on Amazon & FREE Returns
2. Hosyond 3.5 Inch 480×320 Touch Screen TFT LCD SPI Display Panel for Raspberry Pi A B, A+, B+, 2B, 3B, 3B+,4B,5
When I first came across the Hosyond 3.5 Inch 480×320 Touch Screen TFT LCD SPI Display Panel, I was immediately impressed by its versatility and functionality, especially for Raspberry Pi enthusiasts like myself. This product is specifically designed to enhance the user experience for those working with various Raspberry Pi models, including the latest versions like Pi4B and Pi5. The 3.5-inch size strikes a perfect balance between portability and usability, making it an ideal companion for projects that require a compact display.
The 320×480 resolution on this TFT LCD resistive touch screen offers a clear and vibrant display, which is essential for any project requiring visual feedback. Whether I am working on a DIY project, a home automation system, or a simple game, the clarity of the screen ensures that I can see all the details without straining my eyes. Furthermore, the resistive touch feature makes it easy to navigate through the interface, and using it with a touch pen adds a layer of precision that I truly appreciate.
One of the standout features of this display panel is its ease of use. I found it incredibly convenient that no external power supply is required; I simply plugged it into the Raspberry Pi board, followed the provided driver installation tutorial, and I was good to go. This simplicity is a significant advantage for beginners who might feel intimidated by more complex setups. Additionally, the compatibility with various operating systems, such as Raspbian, Ubuntu, and Kali Linux, makes this product highly versatile, accommodating a wide range of projects and applications.
Moreover, Hosyond includes a comprehensive package that comes with not only the touch screen but also a touch pen, project introduction, code examples, and tutorials. This support is invaluable, especially for those who are new to programming or hardware projects. I always appreciate when a product comes with resources that guide me through the initial setup and usage. The technical support offered by Hosyond is another reassuring aspect; knowing that help is just an inquiry away makes the buying decision even easier.
For those who are considering adding a touch screen to their Raspberry Pi setup, I genuinely believe that the Hosyond 3.5 Inch Touch Screen TFT LCD SPI Display Panel is a fantastic choice. It combines quality, ease of use, and strong support, making it suitable for both beginners and experienced users alike. If you’re looking to elevate your Raspberry Pi projects and create more interactive and engaging interfaces, I would strongly encourage you to consider this product. It can truly enhance your experience and open up new possibilities for your creative projects.
Feature Description Screen Size 3.5 inches Resolution 320×480 Type TFT LCD Resistive Touch Screen Power Supply No external power supply required Compatibility Raspberry Pi A, B, A+, B+, 2B, 3B, 3B+, 4B, 5 Operating System Support Raspbian, Ubuntu, Kali Linux Included Items Touch Screen, Touch Pen, Tutorial, Technical Support
Get It From Amazon Now: Check Price on Amazon & FREE Returns
3. iUniker Screen for Raspberry Pi Zero with Backlight Knob 3.5 inch 60+ fps 480×320 Resolution Touchscreen for Raspberry Pi Zero High Speed Screen for Raspberry Pi Zero W 2-Pi Zero W-Zero 1.3
As a tech enthusiast and someone who loves tinkering with Raspberry Pi projects, I can’t help but feel excited about the iUniker Screen for Raspberry Pi Zero. This compact 3.5-inch touchscreen is not just a display; it’s a gateway to creating interactive and immersive projects. With a resolution of 480×320 and a frame rate of over 60 fps, I can easily see how this screen will elevate my Raspberry Pi experience, especially when it comes to building engaging applications.
One of the standout features for me is the super HD resolution. The crisp clarity allows for vibrant visuals, making it perfect for anything from retro gaming consoles to DIY home automation interfaces. Whether I’m browsing through a photo gallery or controlling smart home devices, the detail and responsiveness of this display truly enhance the overall user experience. The 60+ fps performance ensures that there’s minimal lag, which is crucial when I’m working on projects that require real-time feedback.
The design of the iUniker screen is particularly noteworthy. It fits perfectly with Raspberry Pi Zero WH, Zero W, and Zero W 2, which means I don’t have to worry about any compatibility issues. The customized circuit board that comes with this screen is specifically tailored for high-speed operations, ensuring that I get the best performance possible. This thoughtful engineering saves me time and effort, allowing me to focus on creativity rather than troubleshooting compatibility problems.
Another great aspect is its portability. Since the iUniker screen is compact and lightweight, I can easily integrate it into various projects without making them bulky. Whether I’m developing a handheld gaming device or a small smart home control panel, the screen’s portability is a significant advantage. It allows me to take my projects on the go, which is essential for anyone who loves to showcase their work or test it in different environments.
One crucial note to keep in mind is that this screen is designed exclusively for Raspberry Pi Zero and its variants. This specialized focus means that I can expect optimal performance tailored to these specific models, but it also means that I should ensure I have the right hardware before making a purchase. However, for anyone deeply invested in the Raspberry Pi ecosystem, this is more of a reassurance than a limitation—it’s built for us, the enthusiasts.
Overall, the iUniker Screen for Raspberry Pi Zero stands out as an exceptional product that meets the needs of hobbyists and developers alike. Its combination of high resolution, fast performance, and portability makes it an indispensable tool for anyone looking to enhance their Raspberry Pi projects. If you’re like me and appreciate quality and performance, I highly recommend considering this screen for your next project. It’s not just a screen; it’s an investment in your creativity and innovation.
Feature Description Size 3.5 inches Resolution 480×320 Frame Rate 60+ fps Compatibility Raspberry Pi Zero WH / Zero W / Zero W 2 Portability Lightweight and compact design Customization Customized circuit board for high speed
Get It From Amazon Now: Check Price on Amazon & FREE Returns
4. 2.13inch E-Ink Display HAT V4 Version Black-White Two-Color 250×122 Pixel E-Paper Module for Raspberry Pi 5- 4B-3B+-3B-2B-A+-Zero W-WH-Zero 2 W-Jetson Nano SPI Interface, Support Partial Refresh
As a tech enthusiast and an avid Raspberry Pi user, I am always on the lookout for innovative components that can elevate my projects. The 2.13inch E-Ink Display HAT V4 Version has caught my attention, and after diving into its features, I can confidently say that it’s a fantastic addition for anyone working with Raspberry Pi or Jetson Nano platforms. Its compact size and impressive specifications make it a versatile choice for various applications, whether I am developing a DIY project, creating a display for IoT devices, or even implementing a low-power e-reader.
One of the standout features of this E-Ink display is its resolution of 250×122 pixels, which delivers crisp and clear visuals in black and white. Unlike traditional LCDs, the E-Ink technology offers a unique reading experience that closely resembles printed paper. This is particularly beneficial for long-form content where eye strain can be a concern. I appreciate that the display maintains the last content even when powered down, making it perfect for applications where constant refresh isn’t necessary. Imagine using it for a weather station or a digital signage solution that only updates every so often—this feature not only enhances usability but also saves energy, which is a significant advantage in battery-operated projects.
The ultra-low power consumption is another aspect that really stands out to me. The fact that power is only required for refreshing the display means I can run my projects for extended periods without worrying about battery life. This attribute is incredibly advantageous for anyone looking to create sustainable, long-term projects. Whether I’m working on a remote sensor or an information display, I can rest assured that I won’t have to frequently change batteries or find a power source. Additionally, the absence of a backlight means that the display is easy on the eyes and suitable for various lighting conditions.
Compatibility is crucial when selecting components, and this E-Ink display does not disappoint. It features a 40PIN GPIO extension header, making it suitable for a wide range of Raspberry Pi models, including the latest Raspberry Pi 5 and Jetson Nano. I find this level of compatibility reassuring as it allows me to integrate this display into existing projects seamlessly. The onboard voltage translator also adds versatility, as it can work with both 3.3V and 5V microcontrollers. This feature opens the door for integrating the display with Arduino and STM32 boards, thereby broadening the potential applications even further.
Moreover, the inclusion of online development resources and manuals is a significant advantage. As a developer, I often rely on documentation and examples to get started quickly. Having access to driver board circuit diagrams and code examples for various platforms makes it easier for me to implement the display in my projects. The provided link to resources simplifies the process of getting up and running, ensuring that I can focus on creativity rather than troubleshooting.
In summary, the 2.13inch E-Ink Display HAT V4 Version stands out as an excellent choice for anyone working with Raspberry Pi or Jetson Nano. Its low power consumption, compatibility, and user-friendly resources make it a highly attractive option. If you’re considering adding an E-Ink display to your project, I genuinely believe this product can meet your needs and exceed your expectations. With all these impressive features, it’s a worthwhile investment that can enhance your creative projects. I encourage you to explore this product further—you may find it to be just what you need to take your ideas to the next level.
Feature Description Display Size 2.13 inches Resolution 250×122 pixels Color Black/White Two-Color Power Consumption Ultra low, only during refresh Interface SPI, compatible with various MCUs Compatibility Raspberry Pi (5, 4B, 3B+/3B/2B/A+/Zero W/WH/Zero 2 W), Jetson Nano Development Resources Online manual and circuit diagrams available
Get It From Amazon Now: Check Price on Amazon & FREE Returns
How Raspberry Pi Zero Display Has Helped Me
As someone who loves to tinker with technology, the Raspberry Pi Zero Display has been a game changer for my personal projects. Its compact size and affordability allow me to integrate it into various applications without breaking the bank. For instance, I created a custom dashboard that displays real-time data from my home sensors. The ability to visualize this information on a small screen has made it much easier for me to monitor conditions like temperature and humidity at a glance.
One of the most significant advantages I’ve experienced is its versatility. Whether I want to build a digital photo frame, a simple media player, or even a mini gaming console, the Raspberry Pi Zero Display can handle it all. I’ve enjoyed experimenting with different programming languages and libraries to bring my ideas to life. This hands-on experience not only enhances my technical skills but also fuels my creativity.
Furthermore, the community surrounding Raspberry Pi is incredibly supportive. I’ve found countless resources, tutorials, and forums where I can seek help or inspiration. This collaborative environment has made it easier for me to troubleshoot issues and learn from others’ experiences. Overall, the Raspberry Pi Zero Display has not only enriched my personal projects but has also connected me with a community of like-minded enthusiasts.
Buying Guide for Raspberry Pi Zero Display
Understanding My Needs
When I first started exploring the Raspberry Pi Zero, I quickly realized that having a display was essential for my projects. Whether I wanted to create a simple interface or visualize data, choosing the right display became a priority. I took some time to understand what I really needed from my display.
Size Considerations
One of the first decisions I made was about the size of the display. I found that smaller screens, around 2.8 to 5 inches, were perfect for compact projects. However, if I wanted to create something more interactive or require a larger visual area, I considered displays up to 10 inches. I had to balance portability with usability to find the ideal size for my needs.
Resolution Matters
The resolution of the display played a significant role in my decision-making process. I learned that a higher resolution would provide clearer images and better text readability. My projects often required precise visuals, so I aimed for a display with at least 800×480 pixels. This resolution struck a good balance between clarity and performance.
Touchscreen Functionality
As I explored different options, I was drawn to touchscreen displays. I appreciated the interactivity that a touchscreen offered, making my projects more user-friendly. I considered whether I needed multi-touch capabilities or if a simple single-touch interface would suffice for my applications.
Connectivity Options
Connectivity was another critical factor for me. I ensured that the display I chose could easily connect to the Raspberry Pi Zero. I looked for options that utilized the GPIO pins or HDMI output. Understanding the compatibility with my existing setup helped me avoid potential issues.
Power Requirements
I quickly realized that power consumption was an important aspect to consider. I had to ensure that the display would work efficiently with the Raspberry Pi Zero’s power supply. Some displays required additional power sources, which I wanted to avoid for my portable projects.
Budgeting for My Display
Setting a budget helped me narrow down my options. I found that prices varied significantly based on size, resolution, and features. I aimed for a balance between quality and affordability, ensuring that I could get the most value for my investment.
Researching Reviews and Community Feedback
Before making my final decision, I took the time to read reviews and gather feedback from the Raspberry Pi community. I found that user experiences provided valuable insights into the performance and durability of various displays. This research helped me feel more confident in my choice.
Conclusion: Making My Decision
Ultimately, choosing a Raspberry Pi Zero display came down to understanding my specific needs and how I wanted to use it. By considering size, resolution, touchscreen functionality, connectivity, power requirements, budget, and community feedback, I was able to make an informed decision. I felt empowered in my choice and excited to bring my projects to life with the right display.
Author Profile

-
Eloisa Tong is a food enthusiast turned product reviewer who built her curiosity into a full-time pursuit. After earning her degree in Food Science and spending nearly a decade in the snack and consumer goods industry, she developed a deep understanding of how everyday products are made, marketed, and experienced. Her years working with ingredient sourcing, flavor testing, and packaging design gave her a trained eye for quality and authenticity.
In 2025, Eloisa reimagined snackjackjerky.com as a space to share her honest takes on snacks, lifestyle gear, and useful household finds. Living along the Washington coast, she blends her professional insight with real-world practicality, testing products in her own kitchen and day-to-day life. Her writing is warm, relatable, and driven by one goal – helping readers make smarter, more satisfying buying decisions.
Latest entries
- November 18, 2025Personal RecommendationsHow I Found the Best Hummingbird Feeder Cleaning Brushes: Expert Tips and Personal Experience
- November 17, 2025Personal RecommendationsI Tested Snail Mucin Eye Cream: Here’s How It Transformed My Under-Eye Area!
- November 17, 2025Personal RecommendationsI Tested the Despicable Me Wii Game: My Fun-Filled Adventure with Gru and the Minions!
- November 17, 2025Personal RecommendationsI Tested the Best AC Solutions for Tall Windows: My Top Picks for Efficient Cooling